Showing posts with label Info Tech 10/11/12. Show all posts

Friday, 8 June 2018

Infor Tech Seniors : Stop Motion June 12, 2018

 The final project in media is a stop motion:

I’ve been enamoured with stop motion films since I first saw Norman McLaren’s anti-war classic ‘Neighbours’ a longgggg time ago- and it was already old then. In the last several years, I’ve seen countless examples of conventional stop motion videos such as “Tony vs. Paul”, “Western Spaghetti”,  There are hundreds and hundreds more.

What I like about these videos is that there is so much variation and creativity among these pieces. There is no simple recipe or formula and from a technical standpoint, the method for creating stop motion effects is done in a number of unique ways. And, if you consider a video like “Amateur” by Lasse Gjertsen, you will realize that stop motion is more than just choppy video. Rather, it’s a method of construction that allows artists to create things that could not be formed similarly through other methods.
 Your instructions:
So now it is your chance to create a stop motion. You will need a lot of patience, but it will be short and simple. I will supply some props and you can create the scene.  Stop motion is by creating a series of frames and putting them together. 

Assignment: One short video of 10 secs minimum. Bonus if you put music or sound effects.  Good luck.  Enjoy the process... The results are always very pleasing.

Here is an example from a few years ago:

A

How to make a stop motion in iMovie on Mac. Go to iMove and then select Preferences. Change the Photo Placement from Ken Burns to Fit in Frame to keep your images to zoom in and zoom out in the stop motion effect. Drag all the well-ordered photos to the timeline.

Monday, 4 June 2018

InfoTech Seniors: Media Unit Lyp sync video

#3. Storytelling Lip-Syncs/ Voice Over:

Awhile, ago I discovered "bored shorts,"{I'm sure it's something you've all discovered a long time ago} - if not, it is Youtube channel where kids write & record audio stories and adults reenact the stories while lip-syncing the original audio. They have been around since about 2011 and are still going strong.  My favourite video so far is this “Salesman” clip, but see also “Principal’s Office” (the older material being the best). But for a more contemporary video:

The point is this is a great idea for you to try another video technique.  It certainly doesn't have to be a kids voice dubbed for an adult.  You could change gender. You could lay your voice over a child's voice.  There are many possiblities.

 I will leave you to be responsible for writing, narrating and recording audio stories and then have someone else  lip-sync the video in creative ways.  Or perhaps you can come up with a different idea. This could provide an on ramp for some great collaboration and create a project that will be humorous and fun.

Assignment:

You can use your phones to record video and upload it to iMovie to edit. You can also find some footage of someone speaking and use a voice over from someone else. It is important to keep it relatively short ( 20 seconds to 1 minute absolute max).

Here are some links:

How to do a voice over on iMovie

How to use iMovie for beginners 
 
Streamable - allows you to cut snippets of Youtube videos in browser and then you can upload them to iMovie!

Thursday, 31 May 2018

InfoTech Seniors: Media Unit: Genre Shifting May 30, 2018

Genre Shifting Movie Trailers:

One of my favourite types of video projects are the genre-shifted movie trailers where creators take movie clips and retell the plot of the story in a different genre than the original. Popular examples include (see if there is one here you have not seen) 

The Shining as a romantic comedy, Mary Poppins as a dark horror film, Home Alone as a horror/thriller, Superbad as a thriller, Ferris Bueller’s Day off as an indie “coming of age” film and Mrs. Doubtfire as a horror film.

Genre-shifting video projects are valuable in a number of ways. As video creation projects, they do not require a high-level of technical ability. With basic video editing capabilities you can create videos similar to these using iMovie trailer. This projects challenges you to think about the essentials of storytelling while considering the elements of creating video (e.g., music, timing, edits/cuts, effects, pauses/silence, etc.) for various genres.


How to? It is easy follow these instructions: How to create a trailer on iMovie?

Assignment:

Using iMovie on the iPads got to create a trailer and shift the genre on a favourite movie or cartoon. You can use the footage from a trailer or you can use still pictures to create your, "Genre Shifting" video.

You can use streamable to cut youtube videos in browser.  Please ask me to help you if you can't figure the poster out.

Wednesday, 30 May 2018

Infotech Seniors May 30th, 2018

Oh yay! A media unit!!!!  This is a chance for you all to take your creative ideas and turn them into a piece of art. I will offer you some ideas to try, and the tools for you to create your masterpiece.  You will work with an ipad or your phones to film the footage and then you will use i-movie or an in-browser editor to edit your work. And some of the in-browser video have templates. We will start here with the easy stuff and I will add a different lesson and different tools for you to try.  

So, if you may have noticed that videos are on a roll at the minute. They are the new and best way to promote, teach or explain something within a short time frame. With more and more videos being produced it makes sense that tools are coming out that enable the humble online traveller to be able to create their own simple but powerful videos. Quick simple animation videos that give a quick tutorial on how to to do something, or teach people about a service, or demonstrate learning are really easy for people to understand and they can simplify complex details. Plus they look good and are fun to watch.
I’ve tried out 3 *free online video makers that are simple enough for you to use yourself and keep the quality decent.  Please post a link to your video on your Weebly - use a button and label the button.

Biteable –

Biteable home screen image

It really is. Biteable has made making a video super simple. They have a massive amount of templates to choose from and they’re grouped really well to help you keep your video consistent, graphics-wise. It’s free to use to create a video but you’ll have a watermark over it. I created a short video in just 20 minutes.

Look at my video created on Biteable called: How to create a video on Biteable

Raw Shorts –

Raw Shorts home page image

Raw shorts also focuses on animation type videos. It has templates, like Biteable, that you can go in and edit each scene in the video. You can easily add, move, duplicate and delete as you’d imagine.

You can get into a lot more detail with the animations in Raw Shorts which is nice potentially but if you get a bit stuck then it’s super easy to get very stuck. The majority of the dashboard and edit tools are easy to use, but when you start getting into the animation details I tend to get put off with all the detail. I like simple.....really simple. It's also a little too business oriented....but see what you can create.


Shakr  

Shakr is very good. It creates videos a little differently to Biteable but it’s still simple to use and you do get a high-quality finish. They have video templates specifically for all sorts of uses such as social media posts, product launches and infographic style videos. When you pick a template, it tells you exactly what you need to add to complete the video. For example, for a specific template, you may need to add 4 videos and 6 images to make up the whole video. This does mean that you need to create some of the content yourself unless you are happy with what is provided.
Things I didn’t like was that some of the functions weren’t as user-friendly as they could be. For example, it doesn’t seem to let you jump from scene to scene when editing, so no re-arranging the order of the video.


Assignment criteria:  I want you to look at all three and decide on the two that you would like to make a video with.  Bonus if you try all three.  Decide what you want to make a video of.  These types of templates are great for quick tutorials:  Teaching a how to, demonstrating some kind of learning. Post them on your Weebly and we will take a look at them on Friday's class. 

Sunday, 27 May 2018

Monday, May 28 and 29th 2018 InfoTech Seniors

We are changing our tune a little and have started with some hands on work in Infotech.
We are working together on Microbits. I have taken you through a lesson on how they work and you've had a chance to explore the website and tried a few things. On Tuesday we will try coding an experiment to test the moisture levels of soil.


1. We will look at some general commands and learn how to navigate around the program.
2. We will get out micro bits and code them.


Friday, 25 May 2018

Infotech Seniors Friday, May 25, 2018

Good Morning!  We will be back in our classroom as of Monday morning!  Today you will finish up the Python exercise I have left you and post it to your Weebly!  If you are frustrated let the TTOC know and she/he can arrange someone to help. 

Chin up! We will be starting something new on Monday.

Wednesday, 23 May 2018

May 24, 2018 Python Assignment

This Assignment is Due on Friday May 26, 2018

Those of you who have completed Code Academy and My blog lessons will find these equations straightforward and will know where to look for answers. I would like you to open a google document and/ or a Word document. Put your name and the date at the top and give it the title Python. Answer the questions.  Take screen shots of the code you have run in
Skulptor and upload photo onto the word doc.  When you are finished upload the word document into a Scribd doc in your assignment section on your Weebly. Word documents work best, so if you make it a google doc, convert it when you are finished.  If you do not know how to convert a google document to a word document please ask me to help.

To have your assignment listed as "on time" you will have to have it posted on your Weebly by the end of class on Friday, May 26th.  

Python:

1.  This coding language is used best for what kinds of programming? (at least three examples)

2.  Define a function:

a) my favourite subject is __________
b) This summer I hope to __________
c) When I graduate, I will___________

3. Correct this code so it will run.

if 10>9 print (Ten is greater than 9)

4. Create a coder message appropriate to this piece of code (hint: #)

x=25
y= Heeeers Johnny!

5. create your own variable that prints, I am in grade ____!

6.What can a variable start with and what can it not?
a) b) c) d)

7.  Define a variable for x and print this command with x as your variable.

("Python is" + x)

8.Define a function called I <3 pizza   * yes, it can be your own favourite food 

9. Parameters:

Create a code using parameters that defines your last name and when run gives each of your family members your last name.

10. Define a function for which country you are from.  Try this out with at least four different countries.

11. Define my function as (x).  x will be the multiplication table 4. give me the 4 times table from 1-10.

12. Using lambda define a doubler and tripler function for the number 25 

13. lists and loops

a) Create a list of favourite sports, computer games,  activities
b) Create a break for one your lists
c) ask it  not to print one of the items on each of your lists


Bonus:  

Create a program that asks the user to enter their name and their age. Print out a message addressed to them that tells them the year that they will turn 100 years old.
Extras:
  1. Add on to the previous program by asking the user for another number and printing out that many copies of the previous message. (Hint: order of operations exists in Python)
  2. Print out that many copies of the previous message on separate lines. (Hint: the string "\n is the same as pressing the ENTER button)

User input in Python

To get user input in Python (3), the command you use is input(). Store the result in a variable, and use it to your heart’s content. Remember that the result you get from the user will be a string, even if they enter a number.
For example,
name = input("Give me your name: ")
print("Your name is " + name)
What this will print in the terminal (or the shell, whatever you are running Python in) will be:
>>> Give me your name: Michele
Your name is Michele
What happens at the end of input() is that it waits for the user to type something and press ENTER. Only after the user presses ENTER does the program continue.

Here is a link to W3school  Python that may help .


Good Luck!


Tuesday, 22 May 2018

What is due for the Python unit.

So that you receive full marks for the Python unit.  You will have to have completed the following and posted it to your Weebly assignments page in three steps.

1. A screen shot of your completed Python lesson in Code academy - 16/16 elements.

2. Go through the lessons: indention, variables, function and loops that I posted on my website.

3.  Answer the questions that I will post here on May 23, 2018. and run the solutions in Code Skulptor.  When you have finished, take a screen shot of your work.  You will have class time to complete this by this week, however, we will be going on to microbits by Friday. So you will be doing this on your own time.


SCREEN SHOT: Command, shift and 4

InfoTech Seniors May 22, 2018 Python Loops

Python For Loops

A for loop is used for iterating over a sequence (that is either a list, a tuple or a string).
This is less like the for keyword in other programming language, and works more like an iterator method as found in other object-orientated programming languages.
With the for loop we can execute a set of statements, once for each item in a list, tuple, set etc.

Example

Print each fruit in a fruit list:

fruits = ["apple", "banana", "cherry"]
for x in fruits:
  print(x)


The for loop does not require an indexing variable to set beforehand, as the for command itself allows for this. 

The break Statement

With the break statement we can stop the loop before it has looped through all the items:

Example

Exit the loop when i is 3:

fruits = ["apple", "banana", "cherry"]
for x in fruits:
  if x == "banana":
    break
  print(x)

The continue Statement

With the continue statement we can stop the current iteration of the loop, and continue wit the next:

Example

Do not print banana:

fruits = ["apple", "banana", "cherry"]
for x in fruits:
  if x == "banana":
    continue
  print(x)


Friday, 18 May 2018

May 18, 2018 InfoTech Seniors

Let's keep going with another concept:

Python Functions 

A function is a block of code which only runs when it is called.
You can pass data, known as parameters, into a function.
A function can return data as a result.

Creating a Function

In Python a function is defined using the def keyword:

Example: 

def my_function():
  print("Hello from a function") 

Calling a Function

To call a function, use the function name followed by parenthesis:   
Example:

def my_function():
  print("Hello from a function")


my_function()

Parameters

Information can be passed to functions as parameter.
Parameters are specified after the function name, inside the parentheses. You can add as many parameters as you want, just separate them with a comma.
The following example has a function with one parameter (fname). When the function is called, we pass along a first name, which is used inside the function to print the full name:

Example:

 def my_function(fname):
  print(fname + " Refsnes")

my_function("Emil")
my_function("Tobias")
my_function("Linus") 


Default Parameter Value

The following example shows how to use a default paramter value.
If we call the function without parameter, it uses the default value:
Example:

def my_function(country = "Norway"):
  print("I am from " + country)

my_function("Sweden")
my_function("India")
my_function()
my_function("Brazil")  


Return Values

To let a function return a value, use the return statement:
Example:

def my_function(x):
  return 5 * x
print(my_function(3))
print(my_function(5))
print(my_function(9)) 


Lambda Functions

In python, the keyword lambda is used to create what is known as anonymous functions. These are essentially functions with no pre-defined name. They are good for constructing adaptable functions, and thus good for event handling.

Example:
myfunc = lambda i: i*2
print(myfunc(2))


Lambda defined functions can have more than one defined input, as shown here:

myfunc = lambda x,y: x*y
print(myfunc(3,6))

The power of lambda is better shown when you generate anonymous functions at run-time, as shown in the following example.

Example:
def myfunc(n):
  return lambda i: i*n

doubler = myfunc(2)
tripler = myfunc(3)
val = 11
print("Doubled: " + str(doubler(val)) + ". Tripled: " + str(tripler(val)))


Tuesday, 15 May 2018

Info Tech Seniors: May 16, 2018

For some of us Python is a little confusing.  But once you have a chance to play around with it, hopefully, you will understand it a little more.  The Code Academy Course is a bit difficult as it does not explain clearly -Why and How  to code in Python.  I have selected a few lessons and I want to you to try them in Skulptor.


You can run the examples and when you have finished clear the board and begin and then follow the lessons below.

What is Python?

Python is a popular programming language. It was created in 1991 by Guido van Rossum.
It is used for:
  • web development (server-side),
  • software development,
  • mathematics,
  • system scripting.

Python Syntax compared to other programming languages

  • Python was designed to for readability, and has some similarities to the English language with influence from mathematics.
  • Python uses new lines to complete a command, as opposed to other programming languages which often use semicolons or parentheses.
  • Python relies on indentation, using whitespace, to define scope; such as the scope of loops, functions and classes. Other programming languages often use curly-bracket
Lesson starts here: Run these in Skulptor:

1. Python Indentations

Where in other programming languages the indentation in code is for readability only, in Python the indentation is very important.
Python uses indentation to indicate a block of code.

Example:  Try this in Skulptor after you have cleared the editor.
Python will give you an error if you skip the indentation:

if 5 > 2:
  print("Five is greater than two!")

2. Creating Variable

a) Unlike other programming languages, Python has no command for declaring a variable.
A variable is created the moment you first assign a value to it.

Example:
x = 5
y = "John"
print(x)
print(y)


b) Variables do not need to be declared with any particular type and can even change type after they have been set.
 [ the # shows us a message that the coder wants you to read but will not show up on the screen when you run the code]
Example:
x = 4 # x is of type int x = "Sally" # x is now of type str print(x)

3.Variable Names: Remember that variables are case-sensitive

A variable can have a short name (like x and y) or a more descriptive name (age, carname, total_volume). Rules for Python variables:
  • A variable name must start with a letter or the underscore character
  • A variable name cannot start with a number
  • A variable name can only contain alpha-numeric characters and underscores (A-z, 0-9, and _ )
  • Variable names are case-sensitive (age, Age and AGE are three different variables)

4. Output Variables

The Python print statement is often used to output variables.
To combine both text and a variable, Python uses the + character:

 
Example:
x = "awesome"
print("Python is " + x)

Example:
x = "awesome"
y = "Python is " + x
print(y)
 

Example:
x = 5
y = 10
print(x + y)
 

Example: If you try to combine a string and a number, Python will give you an error: 
x = 5
y = "John"
print(x + y)


When you have completed these steps: Go back to Code academy and see if it is a little more clear : We will try some more tomorrow.
 

Friday, 11 May 2018

InfoTech Seniors May 11, 2018

Today, we will finish our websites and you will drag your website file into the 101 drop box.  Even if you have not yet finished, by the end of class today, you will give me whatever you have.

I have booked the Chrome books and we will start on Python in Code academy.  I know we are getting close to the end and the drive to keep going is waning, but we still have deadlines to meet.  I would like the Code Course to be completed as quickly as possible.  So please work, break, work break and not the other way around.

We will have a some kind of coding project in Python and then we will move on to the micro-bits for a bit of a hands on change.  For the last two weeks of school  (before exam week) you will have a passion project - that means you can work on a project of your choice: adobe photoshop, gimp, scratch, coding or something you are thinking about - please let me know. We are getting close to the end (5 weeks and counting until exam week)

Tuesday, 1 May 2018

May 1, 2018 Info Tech 10/11/12

Info Tech:

Websites due May 11th:

1. Header, Footer, Columns
2. Links to favourite sites
3. Drop- down with to another page (one page minimum)
    - could contain your biography and unique things about you.
     - photo (of you or avatar)
4. Main site should also contain photo (extra marks if it is in the header)
5. Put a GIF in - homemade or found.
6. Put your file with website into dropbox 101 on your computer desktop

GOOD LUCK!

"I'm finished Ms. Wagner!"

Awesome......then you can go to....
Code Academy and start on Python.  Let me know your progress and any ruts you run into.
We will create a game- a basic game in Python for our next unit - so get crackn'


Tuesday, 24 April 2018

InfoTech 10/11/12 Connecting Pages

Connecting two pages (some options)

<a href="login.html"><button>Go To Login</button></a>

This may not work in dreamweaver browser/workspace.

If you can not do that then you can try a form:
<form action="login.html">
<input type="submit" value="Go to Login">
</form>


If these don't work I would suggest setting up a work-space on your computer.
(a local environment)
To do this..
  1. Put both of your html files in a folder.
  2. Drag your opening html page into a blank tab on your browser
If you do that the link buttons should definitely work.
And make sure the <a href= points to your other html file you want to go to.


Thursday, 19 April 2018

April 19, Info Tech 10/11/12

Today, I am away.  Please work on your coding lessons.  When you have completed them- you will begin applying what you have learned to your own website.  You should note that last class I have given the codes that will help you to create a layout.  It is important how your web page is laid out - remember from our good and bad website lesson how important layout and style is.  I want us to eventually create a picture gallery, links and drop downs. 

You may want to call your website My Info Tech Site or you may have something else in mind.

Wednesday, 18 April 2018

April 18, 2018 Tech 10/11/12 Font and Website Layout

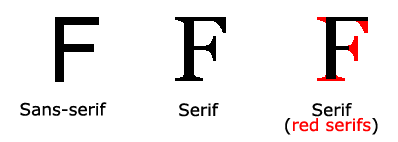
Difference Between Serif and Sans-serif Fonts CSS Font Families

Serif vs. Sans-serif


CSS Font Families

In CSS, there are two types of font family names:
  • generic family - a group of font families with a similar look (like "Serif" or "Monospace")
  • font family - a specific font family (like "Times New Roman" or "Arial")
Generic family Font family Description
Serif Times New Roman
Georgia
Serif fonts have small lines at the ends on some characters
Sans-serif Arial
Verdana
"Sans" means without - these fonts do not have the lines at the ends of characters
Monospace Courier New
Lucida Console
All monospace characters have the same width

Font Family

The font family of a text is set with the font-family property.
The font-family property should hold several font names as a "fallback" system. If the browser does not support the first font, it tries the next font, and so on.
Start with the font you want, and end with a generic family, to let the browser pick a similar font in the generic family, if no other fonts are available.

Example: Try it yourself

Font Style

The font-style property is mostly used to specify italic text.
This property has three values:
  • normal - The text is shown normally
  • italic - The text is shown in italics
  • oblique - The text is "leaning" (oblique is very similar to italic, but less supported)
Example: Try it yourself

Website Layout

A website is often divided into headers, menus, content and a footer:

1.  Header
A header is usually located at the top of the website (or right below a top navigation menu). It often contains a logo or the website name:

Example: try it out

2. Navigation Bar
A navigation bar contains a list of links to help visitors navigating through your website:

Example: Try it out

3. Content
The layout in this section, often depends on the target users. The most common layout is one (or combining them) of the following:
  • 1-column (often used for mobile browsers)
  • 2-column (often used for tablets and laptops)
  • 3-column layout (only used for desktops)
Example: Try it out

4. Unequal Columns
The main content is the biggest and the most important part of your site.
It is common with unequal column widths, so that most of the space is reserved for the main content. The side content (if any) is often used as an alternative navigation or to specify information relevant to the main content. Change the widths as you like, only remember that it should add up to 100% in total:

Example: Try it out

5. Footer
The footer is placed at the bottom of your page. It often contains information like copyright and contact info:

Example: Try it out

6. Responsive Website Layout
By using some of the CSS code above, we have created a responsive website layout, which varies between two columns and full-width columns depending on screen width:


Tuesday, 17 April 2018

Info Tech 10/11/12 Looking at CSS for design

CSS Introductions:  ONCE YOU HAVE LOOKED AT THE EXAMPLES TRY TO TALOR THE LEARNING FOR YOURSELF.  SEE WHAT IMAGE YOU CAN FIND TO USE OR COLOURS.  THINK ABOUT THE LAYOUT

What is CSS?

  • CSS stands for Cascading Style Sheets
  • CSS describes how HTML elements are to be displayed on screen, paper, or in other media
  • CSS saves a lot of work. It can control the layout of multiple web pages all at once
  • External stylesheets are stored in CSS files

Why Use CSS?

CSS is used to define styles for your web pages, including the design, layout and variations in display for different devices and screen sizes.

CSS Syntax

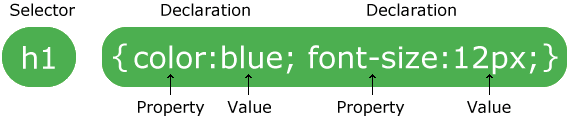
1. A CSS rule-set consists of a selector and a declaration block:
CSS selector
The selector points to the HTML element you want to style.
The declaration block contains one or more declarations separated by semicolons.
Each declaration includes a CSS property name and a value, separated by a colon.
A CSS declaration always ends with a semicolon, and declaration blocks are surrounded by curly braces.

In the following example all <p> elements will be centre-aligned, with a red text colour:

Example: TRY IT YOURSELF

2. If you have elements with the same style definitions. It will be better to group the selectors, to minimize the code.
To group selectors, separate each selector with a comma.
In the example below we have grouped the selectors from the code above:

Example: TRY IT YOURSELF

3. CSS Colours
Colours are specified using predefined colour names, or RGB, HEX, HSL, RGBA, HSLA values.

COLOUR NAMES
In HTML, a color can be specified by using a color name:

Tomato
Orange
DodgerBlue
MediumSeaGreen
Gray
SlateBlue
Violet
LightGray


Example: TRY IT YOURSELF

4. Background Colour

You can set the background colour for HTML elements:
Hello World


This will help define your website and give it clarity and focus.  It is important to think about what colours go together and how you can make it look as nice as possible.  Remember no one likes a jarring or messy looking website.


Please change the paragraph to say something you would like to say about he website you will create.
Example: TRY IT YOURSELF

5. Border Colour

You can set the colour of borders:

Hello World

Hello World


Hello World

 Try different colours than those suggested. Example: TRY IT YOURSELF

6. CSS Backgrounds


The CSS background properties are used to define the background effects for elements.
CSS background properties:
  • background-color
  • background-image
  • background-repeat
  • background-attachment
  • background-position
CSS Colour Background:
The background-color property specifies the background colour of an element.
The background colour of a page is set like this:

Example: TRY IT YOURSELF


Background Image - Repeat Horizontally or Vertically

By default, the background-image property repeats an image both horizontally and vertically.

Some images should be repeated only horizontally or vertically, or they will look strange, like this:

Example: TRY IT YOURSELF


Background Image - Fixed position

To specify that the background image should be fixed (will not scroll with the rest of the page), use the background-attachment property:

Example: TRY IT YOURSELF

Sunday, 8 April 2018

Info tech 10/11/12 Coding

Today we will start with some simple coding.

HTML stands for Hyper Text Mark-Up Language and is a set of codes or <tags>. <Tags> are the instructions used to create Web pages.

Tags are always enclosed within angle brackets, called "carats."  An opening carat is: <  and a closing carat is: >

The opening tag for an HTML document is always <html> and the closing tag is always </html>.  Note that the closing tag has the same command as the opening tag, except that it has a slash before the command.  These tags tell the web browser that you are using (Firefox) that the document can be viewed as a web page.

HTML is not case sensitive, so it is ok to write the code tags in lowercase letters.

*** NOTE ***  As you move through the HTML unit, we will be creating personal web pages, with pictures, images, etc.  It is crucial that all of your images, pictures, and HTML documents are ALWAYS be saved in the same folder, so create a folder called web page design inside your student folder, and always save everything for your web page there! You can leave it on the desktop of the computer you usually use.


 For a text editor use: jsfiddle.net
 It is free and easy to use.

Basic Tags
<html>         defines the HTML document

<head>       defines the head (or header) of the document

<body>       defines the body of the document

<title>         defines the title of the document; this appears in the title bar of the web browser window

<p>             defines a block of text as a paragraph, and formats it accordingly


Click the link below to see how the basic elements of a webpage’s content is displayed:
http://www.w3schools.com/html/tryit.asp?filename=tryhtml_basic


Each student must create an HTML file titled p2[your name]htmlintro.html using a text editor program (use either Text Wrangler or Text Edit), and save it in the P2 folder (or if you've been able to log into your student account on the server, you can create an "HTML work" folder within your personal folder) on your computer in a sub-folder called "HTML work".  This process will be demonstrated in class using the Mac file management application called "Finder."

1. Paragraphs
The paragraph tags are: <p>  </p>

To practice basic paragraph tags, click here:

http://www.w3schools.com/html/tryit.asp?filename=tryhtml_paragraphs1

  To practice making larger paragraph tags, click here:

http://www.w3schools.com/html/tryit.asp?filename=tryhtml_paragraphs2


Open your HTML document in your chosen text editor, and then type the correct coding so that your paragraph looks like this when you open the HTML file in your web browser:

This is [your name]'s first paragraph
This is [your name]'s second paragraph
This is [your name]'s third paragraph

2. Line Breaks
The line break tag is: <br>

* Note:  the line break tag is one of the few HTML tags that doesn't require and opening and closing tag; instead it just uses <br> to add a break in your HTML document.

To practice basic paragraph tags, click here:
http://www.w3schools.com/html/tryit.asp?filename=tryhtml_paragraphs

In your HTML document, use correct HTML coding so that it will look like this:

This is a
paragraph that [your name] created
using
line breaks.

3.  Problematic Formatting

A problem when coding HTML is that it will ignore any formatting that you use in your text editor program, unless you specifically use HTML tags to tell the web browser how the information in your HTML document should be displayed.  If you type the example below, you will see that the web browser ignores the formatting of the poem used in the HTML file.

<html>
<body>

<p>
    My Bonnie lies over the ocean.

    My Bonnie lies over the sea.

    My Bonnie lies over the ocean.

    Oh, bring back my Bonnie to me.
</p>

<p>Note that your browser ignores the layout in the HTML source code!</p>

</body>
</html>

Try adding line breaks to this example to make it look like a proper poem:

http://www.w3schools.com/html/tryit.asp?filename=tryhtml_poem


It should look like this:

My Bonnie lies over the ocean,
My Bonnie lies over the sea,
My Bonnie lies over the ocean,

Oh, bring back my Bonnie to me.

4. Headings

The tags used for headings are:  <h1> </h1>, <h2> </h2>, etc.

You will see that the <h1> tag creates the biggest heading, while <h6> creates the smallest.

Click here to practice different headings and sizes:

http://www.w3schools.com/html/tryit.asp?filename=tryhtml_headers

Change the headings to your name and add them to your HTML file.


5. Aligning Headings

An example of using heading alignment tags:  <center><h1>________</h1></center>


To practice different alignments, click here:

http://www.w3schools.com/html/tryit.asp?filename=tryhtml_header

In your HTML file, use correct coding to create headings with center, right, and left alignments.

6) Formatting Text

Some examples of tags that will format text in your HTML files are:
<b>______</b>

<strong>_____</strong>

<i>_______</i>

<code>_______</code>

<sub>________</sub>

<sup>________</sup>

<u>_________</u>


Practice formatting the text by clicking the following link:

http://www.w3schools.com/html/tryit.asp?filename=tryhtml_formattingch

Create a sentence that has a bolded word, an italicized word, an underlined word, and use the superscript tag to write out "second" and "third."


7) Inserting a Horizontal Rule

<hr>

A horizontal rule is a dividing line used to make clear distinctions between different parts of a web page.  Like a line break, it only has one tag, rather than an opening and closing tag that most HTML coding uses.

To practice inserting these dividing lines, click here:

http://www.w3schools.com/html/tryit.asp?filename=tryhtml_hr


Create a paragraph with three dividing lines separating parts of the paragraph.


8. Adding Color to the Background and to Paragraphs

<body bgcolor=“________”>

or

<body style="background-color:_____”>

You can also change the background colour of specific paragraphs by adding the style modifier to your paragraph tags:

<p style="background-color:red"</p>

To practice adding color to the background, click here:

http://www.w3schools.com/html/tryit.asp?filename=tryhtml_bodybgcol

In your HTML document, try changing the color of your the background to yellow, and the different paragraphs to blue, red, pink, green, and orange!

If you want to use more specific colours, check out the color codes chart at http://www.htmlcolorcodes.org/


9. Font Style Tags

<p “font-family:_______; color:____”> write your text here</p>

<p “font-size:#px”>write your text here</p>

 *** NOTE *** to add more than one style attribute to a paragraph, use a semi-colon ; to separate the attributes.

Try changing the colors and fonts yourself by clicking the link below:

http://www.w3schools.com/html/tryit.asp?filename=tryhtml_bodybgcol

Make your HTML document so that it has a pink background, with a font-family of verdana, the background of the paragraph is yellow, the text in the paragraph is red, and a font-size of 50.

It should look like this:

10. Inserting images with a heading and border

<h2> title of picture </h2>

<img border=“0” src=”________.jpg” width=“#” height=“#” />

or try a more simple way: <img src=_______.jpg; border=“2”>

*** IMPORTANT NOTE *** - When inserting images into your HTML file, the image that you want to appear MUST be in the exact same folder as where your HTML file exists.  If your HTML file is in your P2\Aman Smith folder, then the .jpg file (or .gif, or whatever format your image file is) MUST be in the same folder, or you have to enter the path where the image resides.

It is STRONGLY recommended that, in order to keep your HTML files, images, etc. organized, you create an "images" sub-folder within your "HTML work" folder, and you can keep all images that you will be using for your various websites in that folder so that they don't clog up your main folder.  So when you add an image into your HTML coding, it will look like:

<img src="\images\[name of file].jpg"; border="[whatever value you like]"; width="[whatever value you like]"  height="[whatever value you like]">

Try changing border sizes here:
http://www.w3schools.com/html/tryit.asp?filename=tryhtml_images_mountain

In your HTML document, write the correct coding so that when it is viewed as a web page in a web browser there are two different photos that you have saved to your computer

11. Aligning Images in Text

.......<img src=“________.jpg”

align= “bottom” width= “ # ” height= “ # ”>.......

Click here to practice changing the alignment and size of the pictures:

http://www.w3schools.com/tags/tryit.asp?filename=tryhtml_img_align


In your HTML file, make a section that has the same image in five different paragraphs, with each paragraph having the picture aligned differently (one top aligned, one middle aligned, one bottom aligned, one right aligned and one left aligned.

12. Floating Images in Text
<img src="smiley.gif" alt="Smiley face" style="float:left;width:42px;height:42px">

Again, note that the different elements in a style tag are separated with a semicolon (  ;  )

Try changing the image from floating on the left, to floating on the right
http://www.w3schools.com/html/tryit.asp?filename=tryhtml_images_float

In your HTML file, show examples of an image floating on the left and right sides of different paragraphs.

13. Inserting an Image to the Background 

<body background = "[location/name of image]">
Copy the image location of another picture on the web and insert it in the proper location in the tag. Click the link below to try it:

http://www.w3schools.com/tags/tryit.asp?filename=tryhtml_body_background

Try changing the body background image to an image that you've downloaded  *** remember that whatever images or pictures are used, must be in the same place as the html document ***
And choose an image that won't interfere with the font of your text!


14. Creating Hyperlinks 

<a href="http://www.whateverwebaddress.com"  target="_blank">clickable text</a>

Try changing the link to a different website such as YouTube, or another of your favourite sites.
http://www.w3schools.com/html/tryit.asp?filename=tryhtml_links


Make sure your HTML file has at least two examples of links to other website.

15. Creating Unordered (Bulleted) Lists

<ul>   </ul> indicates an unordered (bulleted) list
<li>     </li> indicates a list item

Try making a list of your 4 favourite foods
http://www.w3schools.com/tags/tryit.asp?filename=tryhtml_lists4

Add it to your HTML file.

16. Changing Bullet Styles

Bulleted lists can use different styles of bullets, including dots, circles, squares, etc. by indicating the type in the <ul> tag:

<ul type="disc,circle,square">   </ul>

Try changing the style of your bullets:
http://www.w3schools.com/tags/tryit.asp?filename=tryhtml_ul_type


In your HTML file, make sure you have at least two different types of unordered lists

17. Creating Ordered (Numbered, etc.) Lists

<ol>   </ol> indicates an ordered list
<li>     </li> indicates a list item

Just like unordered lists, you can specify different styles of numbers, letters, or Roman Numerals. Look closely at the different types of headings that determine different styles of lists/

Note that the default unordered list would use regular numbers:
  1. like this
  2. like that
  3. like another

But you can use UPPER or lower case letters, Roman Numerals, etc. by indicating the type in the <ol> tag:

<ol type="A">  = upper case lettered list
<ol type="a">  = lower case lettered list
<ol type="i">  = lower case Roman numerals (i, ii, iii, iv, etc.)
<ol type="I">  = upper case Roman numerals (I, II, III, IV, etc.)

Try changing an ordered list:
http://www.w3schools.com/tags/tryit.asp?filename=tryhtml_ol_type


Ensure that you have at least two different types of ordered lists in your HTML file.


18. Inserting Text Entry Fields


You can create fields that require a user to enter various text elements, like a name, address, etc.

<form action=" ">


Try changing the text fields' names:
http://www.w3schools.com/HTML/tryit.asp?filename=tryhtml_input

Insert a text entry field into your HTML document.


19. Inserting Password Fields

Password fields follow the same format as text fields:
<form action=" ">
<input type = "password" name = "password">
Practice working with password fields:
http://www.w3schools.com/HTML/tryit.asp?filename=tryhtml_inputpassword
Notice that text entered into a password field is displayed as asterisks.

Then insert a password field into your HTML document.
______________________________________________________________________
20. Inserting a Button
Buttons are also form action commands, but the input type changes to "button" and the value determines what is displayed on the button:

<form action="">
<input value="Hello world!">


Experiment with using the button field:

http://www.w3schools.com/HTML/tryit.asp?filename=tryhtml_button


Add a button to your HTML file that has your name on it.

______________________________________________________________________

21. Using Text Input Fields and Buttons to Submit Information

Using a combination of input fields and a submit button, information can be forwarded to new files\locations.  The action and method elements determine where the information is sent to.

<form name="" action="demo_form_action.asp" method="get">

Experiment with creating text fields that will be submitted when a button is clicked:

http://www.w3schools.com/HTML/tryit.asp?filename=tryhtml_form_submit


Add text fields that would be submitted if a button was clicked on your HTML file.

______________________________________________________________________

22. Creating Checklists

Check boxes are another form of form action commands, but the input type element must be changed to "checkbox" and the text that appears after the input type elements is what will appear next to the checkbox.

<form action="">
<input value=" "> This text will be next to the checkbox
</form>

Try creating different checklists:
http://www.w3schools.com/HTML/tryit.asp?filename=tryhtml_checkbox


Create a checklist that has at least three checkbox items on your HTML file.

______________________________________________________________________

23. Creating Dropdown Lists

Another form action command is creating dropdown lists.  The option value determines what is in the dropdown list.

<form action="">
<option value="item1"> Item 1 </option>

Try it out here:
http://www.w3schools.com/HTML/tryit.asp?filename=tryhtml_select2

Create a dropdown list on your HTML document that has at least 4 different items that can be selected.

______________________________________________________________________

24. Creating Radio Buttons

Radio buttons are another form action element.  When you select one radio button, all other choices are nulled.

<form action="">
<input >

Try it out here:
http://www.w3schools.com/HTML/tryit.asp?filename=tryhtml_radio

Then add a list of at least four radio buttons on your HTML file.

______________________________________________________________________

25. Creating Tables in HTML

Tables are very important in HTML, as they are used not only to display data in an organized, tabular format, they can also be used as a design tool for building a webpage.

<table> indicates a table is being inserted
<tr> indicates the beginning of a table row
<td> indicates a cell in a table that contains data

Try working with tables, rows, and table data cells here:
http://www.w3schools.com/HTML/tryit.asp?filename=tryhtml_tables

Add a table into your HTML file that has at least four rows and four columns.

Wednesday, 4 April 2018

Info Tech 10/11/12 April 4, 2013

Good Afternoon! I am away today due to illness.  I would like you to continue to work on your desk-top publishing assignment.  Those of you who are powering through this and will be done by tomorrow, can start to use and program the spherobots that I will be bringing in.  We only have them until April 13, so please finish the assignment so you have a chance to use them.

See you tomorrow.

Tuesday, 3 April 2018

April 3, 2018 Info Tech 10/11/12 Poster Assignment

POSTER ASSIGNMENT

Today - I will be away.  I would like you to start on the following short project and I hope it will be completed by Friday.
 
Using Adobe Spark, Pixlr, Canva, (or a graphics program approved by Mr. Wagner) you are to create a poster for National Aborginal Day June 21 or For a local School event such as: the running club, table tennis tournament, coding club, Dungeons and Dragons club - anything and it can be made up.

You are to create 3 Posters in total one on each of the desk-top publishing programs.
** CREATE ONE FROM SCRATCH WITHOUT A TEMPLATE.

You will be using each application in browser. 
·       For Canva you can open, select student, skip inviting team, and then create your own at the top right corner. Play around with it today and see all that it can do!
·      For Pixlr I have a video here that you watch: Pixlr tools
·       For Adobe Spark is straight forward. Sign up with your google account

Elements to consider:
  • Colour(s)
  • Layout (Where you put things on the page)
  • Clarity - How easy is it to read when walking down the hallway
  • Layering (Objects placed over one another to make it visually stunning)
  • Typography (Font Choice)
Create an eye-catching poster that may be put up in our school.
KEY INFORMATION TO INCLUDE FOR THE POSTER:
Poster
·      Some kind of headline or “call to action”
·      think of the audience - Who do you want to join
·      Where to sign-up or where it's going to be held (get the info)
·      The date.
·      Yes – you can make up the event entirely (so do have fun – just remember it must be appropriate according to the Elphinstone/ and school boards code of conduct).

When you have finished:
Post each of your posters on the Assignments page.  Document in-brower application you used and discuss the pros and cons of each of the different programs underneath of each poster. This assignment is out of 27 and I hope you will be finished by Friday allowing time to explore and time to work.